Wednesday, February 27, 2013

Maple Candied Bacon

Now I know I've probably said this a million times, but I love bacon. It's almost disgusting how much I really do. My fiance tried to cook me turkey bacon once...lets just say that never happened again. It was HORRIBLE! It just tasted fake and lets be honest...If you're going to eat bacon, it better be fattening, greesy, and the real shit.(excuse my language) So I'm constantly looking for recipes that include bacon in them. One of my girlfriends is always making fudge, so I found a bacon caramel fudge recipe, but she thinks it's too strange so we haven't had a chance to try it yet..But I'm working on it! Hopefully I'll be able to post that one on here when we do! I have however tried this recipe..maple candied bacon. This is a snack that all your guests will be talking about. I know mine do.

What you'll need:
1 pound of bacon
2 tbsp maple syrup. (not pancake Betty Crocker stuff...The real stuff)
1/4 cup brown sugar
2 tsp Dijon mustard
1/2 tsp kosher salt
1/4 tsp cayenne pepper


What you'll have to do

Preheat your oven to 350 F.Wrap a rimmed baking sheet with aluminum foil and top with a wire rack. In a large bowl, add the maple syrup, brown sugar, Dijon mustard, Kosher salt, and cayenne pepper. Mix well. Add the bacon to the bowl and toss gently with your hands. Make sure that all of the slices are evenly coated. Place the bacon in a single layer onto the wire rack. Bake in the center of the oven for about 20 minutes. The bacon will be a bit brown, but will most likely need to bake for another 10-15 minutes. It should look slightly dark (not burnt) and crispy. If you take it out too soon, the texture will be chewy (gross) Remove from the oven and cool for 5 minutes on the rack. Don’t let them sit too long or else they will stick. Once cool enough to handle, you can break the bacon into chards (you’ll have about 32 pieces). I however kept them whole, just because(:

I'm telling you, this recipe is amazing if you like bacon. If you don't like bacon..I recommend you liking it... I'm telling you, I only put the good recipes on here...The ones I reallllllllly like. This is definitely a top 5 recipe.

  • 1 lb. good quality bacon, sliced
  • 2 tbsp. pure maple syrup (not pancake syrup)
  • ¼ c. brown sugar
  • 2 tsp. Dijon mustard
  • ½ tsp. Kosher salt
  • ¼ tsp cayenne pepper
  • - See more at: http://www.theclevercarrot.com/2012/12/maple-candied-bacon/#sthash.poBVlOEO.d
  • 1 lb. good quality bacon, sliced
  • 2 tbsp. pure maple syrup (not pancake syrup)
  • ¼ c. brown sugar
  • 2 tsp. Dijon mustard
  • ½ tsp. Kosher salt
  • ¼ tsp cayenne pepper
  • - See more at: http://www.theclevercarrot.com/2012/12/maple-candied-bacon/#sthash.poBVlOEO.dpu

    Jalapeño Poppers

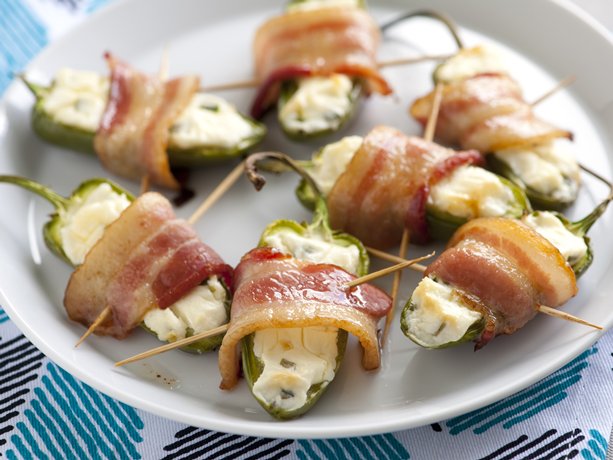
    Bacon-Wrapped Jalapeño Poppers


    So last year I went on a camping trip with my fiancé and his family. And lets just say this family knows how to cook. We were over regular fire pits with nothing else but what we had brought, and they literally cooked 5 course meals. Well even though these meals were incredible, I love the pick food supplied while camping. Especially when it's cold out and something warm and fattening right off the fire pit, it's the best. His aunt introduced me to Jalapeño Poppers. Now most of you think about the deep fried ones, but clearly there was no deep fryer over the fire pit. They were to die for. Being home, I'm not going to start a fire every time I want this delicious snack..So I've compromised a little and used the grill, or even the oven. The best part is I wrap them in bacon too. Talk about amazing! So as always here's the recipe:

    What you'll need:
    10-12 Jalapeños
    1 block of cream cheese
    1 lb. bacon ( I like maple cured the best )  

    First take the block of cream cheese out of the fridge and let soften for a few. then wash and cut all the jalapeños in half and take our all the seeds. They're super hot and can really do some damage to your mouth. Once you have cut all the peppers, take the cream cheese with a spoon and stuff the half peppers with it. Do this to each pepper, and once completed cut the bacon in half. If you don't cut the bacon in half it almost overpowers the pepper itself. Wrap the peppers stuffed with cream cheese with the bacon and stick a toothpick through each one so the bacon will stay wrapped around while you are cooking. Place in oven on a cookie sheet and cook about 20 minutes (if your using an oven). For the last 5 minutes turn the broiler on in the over to crisp up the bacon. You don't want to cook the poppers too long because the bacon starts to squeeze the cream cheese out, so between 15 & 20 minutes, start keeping an eye out...It all depends on your oven. 

    Let sit for about 10 minutes. And then serve & enjoy!
     

    Monday, February 25, 2013

    The "single" brownie

    There are always those days that you just want 1 brownie and you don't feel like making a whole pan of the stuff. I've seen this recipe online tons of times and I was always skeptical of how it would really taste. But obviously, there comes that days where I want that one brownie. It was delicious! OMG it was perfect, and just what I needed. You've got to try it! It only takes 2 minutes!

    here's what you'll need:
    1/3 cup flour
    1/4 cup packed brown sugar
    2 tbsp unsweetened cocoa powder
    pinch of salt
    2 tbsp canola oil
    2 tbsp milk

    In a heatproof mug still the dry ingredients until all the lumps are gone. Then stir in the oil and milk so it looks like a tick paste. Once all is mixed together you are able to microwave. First microwave it on high for a minute, checking every 30 second intervals. It will be done after that minute! through some whipped cream (or my favorite, cool whip) and eat while warm! I like it gooey in the middle so if you don't, maybe add an extra 10 seconds or so in the microwave. Enjoy!

    Chocolate Sweet Potato Pie

    I seriously love to bake and cook, if you all couldn't tell. Its something I really enjoy at home and When I go to family events, I really love just feeding people with new creations and taking in their input about it all. My next recipe is the chocolate sweet potato pie. Sounds weird right? TRY IT! I'm telling you, you won't regret this experience.
    Here's what you'll need:

    For the Crust: 
    3/4 cup coconut flour, 1/2 tsp ground cinnamon, 1 tbsp honey, 2 large eggs, 1/2 cup butter(melted)

    For the pie:

    1 large sweet potato
    80 grams dark chocolate
    2 tbsps cocoa powder
    1/2 cup, and 3 tbsps heavy cream
    1/3 cup honey
    2 large eggs
    1/2 cup butter

    To make the crust: melt the butter and once it has cooled beat in the eggs and honey. Sieve the coconut flour and cinnamon into a mixing bowl. Grafually add the eggs and butter to the four mix. Press it into a 9 inch round pie dish. It's not going to look like a normal pie crust, but don't be alarmed, it's supposed to look like that. Leave in the fridge while you make the filling.

    To make the filling: peel and dice the sweet potato and boil it until tender( about half an hour) Use a double boiler to melt the chocolate, honey and butter together. Once melted set aside to cool. Mash the potato as fine as possible ( I like to use the blender personally ) along with the cream. Whisk the eggs and cream into the cooled chocolate and gradually pour the rest of the mashed potato goop into the mash. Stir it till a forms a semi-runny batter. Pour batter into the dish and bake at 375 degrees for about 20 minutes. Once out, put in the fridge for atleast an hour:) serve and enjoy!

    Sunday, February 17, 2013

    The Perfect Margarita

    My fiance is home from the army and we have had quite a few nights out with our friends since he is only home for a short period of time. Lets just say we have had the pleasure of making THE perfect margarita. This is my weakness, I could seriously drink these all day long without hesitation.

    Make sure you take notes down on this one, you'll thank me..

    2 shots of patron tequila (make sure you don't use anything else. The patron
         makes it, I promise)
    1 shot triple sec
    A splash of orange juice
    Mr. T's margarita mix
    Margarita salt

    Fill the glass about half way with ice. I particularly like a lot of ice versus a little because I like it all ice cold. Mix your 2 shots of patron with your 1 shot of triple sec. Do a little splash of orange juice and finish off the rest of the glass with the Mr. T's margarita mix, and wallah! The perfect drink for a hot summer day by the pool. Trust me, you won't regret making one of these. If you please, add the salt around the edge of the glass and that just adds a little extra(:


    Pretzel Butterscotch Cookies

    This has to be my all time favorite sweet and salty creation. We all know how delicious those pretzel m&m's are, so why not try a cookie with the same effect. 

    The recipe follows:

    2 sticks butter
    2 1/4 cups bread flour
    1 tsp. salt
    1 tsp. baking soda
    1/4 cup sugar
    1 1/4 cups brown sugar
    1 egg
    1 egg yolk
    2 tbsp cream
    1 tsp. vanilla
    1/2 cup chocolate chips
    1/2 cup butterscotch chips
    1/2 cup broken pretzels
    some course sea salt

    Take the 2 sticks of butter and melt them in a larger sauce pan, while it will foam it will also turn a brownish color. Once you have this set aside and let cool. While letting the brown butter cool, sift the flour, baking soda, and salt and put aside as well. Mix the cooled butter (about 20 minutes of cooling) and the sugars, for about 2-3 minutes. After that, start mixing in all other ingredients, but make sure that the flour is mixed in last. I like to eye the flour sometimes because they don't always call for the exact amount that it says. Once everything is all mixed and in the form of amazing looking cookie dough, cover the bowl and leave it in the fridge for about 8 hours. After those 8 hours, line up on a cookie sheet and cook for about 10 minutes (12 minutes if you like a little crispier of a cookie.

    After that enjoy!(: They are addicting by the way, so prepare yourself(:

    Sunday, February 10, 2013

    Effect on media

    I believe that the effects of internet on media are incredible. Everyday. This blizzard that had just occurred would not have been so well prepared if it wasn't for the media and the internet. We also have seen the different effects on the New England Area and the coverage in what we need to do to stay safe. Unfortunately there have been deaths from this storm, not so much the snow itself but the terrible accidents of carbon monoxide poisoning. Not many people realize how these accidents are caused or how they even occur. One child was just trying to keep warm but didn't realized the back up because the car was so covered by snow. If the media didn't get wind of these accidents, others would no realize how to prevent such terrible accidents from occurring. With the internet being so readily available to us, we can be taught and become aware of situations before more and more occur. I think the media availability on the internet is an incredible thing. Although sometimes situations get mixed up and dramatized, it is overall a great thing to have

    Easy Biscuit "Donuts"

    So I found this recipe online the other day and I had to share it with you guys. It is probably the most amazing delicious and easy recipe you ever make. The reason I love it so much, is I'm the biggest doughnut junkie ever and I hate going to dunkin donuts and getting those stale crappy ones that have been sitting in the backroom frozen for days. So I set out on a mission to make my own and have them fresh as I please.

    What you'll need:
    1 Package Grands Biscuts
    Crisco Vegetable Oil
    Sugar
    Brown Sugar (optional)

    So what you'll want to do first is cut all the biscuits into 4, this just makes it easier to cook in the oil and makes it faster. Pour the oil into a sauce pan, enough so that the dough will fit in without touching the bottom. So I'd say about half way, just so that you can keep going without having to refill the oil over and over again. Dip the oil (it should be around 200 degrees) for about 3 minutes, halfway through cooking flip the dough so they can cook evenly on both sides. After that, let cool on a paper towel for a couple minutes and then roll in sugar. You could even do powdered sugar, which ever you prefer:)

    Enjoy!

    RIce Krispie Treats

    What you'll need:

    4 Tablespoons Butter
    1 Package Regular Marshmallows (you can use the rainbow colored ones too if you want a fruity look/flavor) There will be about 40 in a package just an FYI
    6 cups of Kelloggs Rice Krispie Treats

    Steps:
    Put butter into sauce pan and heat up and melt. The reason you do this is so that the marshmallows won't stick when it melts. Otherwise you won't be able to mix the them with the rice krispies at all. Melt marshmallows until no lumps are left. After this take the pan off of the heat and mix in the 6 cups of rice krispies into the melted marshmallows. Mix until all is incorporated then put the mixture into an 8 X 10 pan. Mold until all edges are in smoothed down. If desired, mix in mini m&m's, or really any chocolate candy you'd like. Once completed cover with aluminum foil and put in the fridge. I like to cover it so nothing gets in it.

    Wait a few hours and cut into squares. Leave out in room temperature for about half an hour before serving. :)

    My personal favorite is using this for little kids parties or even doing this as a rainy day activity for you and your kids, they love it and they feel like they're really making something crazy fun.

    Saturday, February 2, 2013

    Guy Fieri

    For high school I went to Whittier Vo-Tech. This was a technical high school located in Haverhill, Ma. It consisted of many different trades and I was in culinary. Freshman year we got to tour all the shops in order to find out what we would spend the next 4 years in. I originally chose business but it was too boring for me and I couldn't just sit at a computer all day and stare at it, so I chose a shop that was more entertaining and enjoyable. I started cooking and soon enough I was doing competitions with fellow classmates and having a ball. We placed a few times in certain competitions and my teachers were very impressed with the talent I had in the trade. 
    So to our surprise Guy Fieri was coming to Lowell for a cooking road show. He asked if our culinary department would like to assist with his live show. My teacher at the school chose me and 5 other people to go. It was quite the experience. We got to meet some crazy amazing people and learn a lot from the master chef himself. We were there all night and got to see just what it's like to perform in front of a crowd. Plus the food was incredible!
    For those who don't know who Guy Fieri is, he is a chef on the food network and has gone through years and years as a food taster. Traveling the states and going to restaurants where the food is just to die for. It is truly incredible what kind of food can come out of such small hole in the wall joints.

    A quick glimpse at who and what Guy Fieri really is..

    Friday, February 1, 2013

    Pizelles


    Since I can remember, my mom and I have been baking. Every holiday, every party, every event we always made something special. Recipes have been passed down from great great grandmother's to my mom and I have been taught the same. Some of the best memories I have are of my mom and I baking in the kitchen, making messes, and laughing for hours. One recipe we have lived on is Pizzelles. It is an Italian sugar cookie, thin and flaky, with powdered sugar on top. It has been a family favorite for years, and I can't wait to be able to share it with my daughters some day. Here is the famous recipe...(:

    6 Eggs
    3 1/2 cups of flour
    2 Sticks of butter
    4 tsp. baking powder
    2 tbsp vanilla (or anise)

    First beat eggs, adding sugar gradually. Beat the mixture until smooth. Add cooled melted butter and the vanilla (or anise). Once you have mixed these ingredients, sift the baking powder and the flour and then add to egg mixture. You want to make sure that the mixture is not runny; making sure that it is sticky enough to be dropped onto the pizzelle pan. 

    Depending on what pizzelle pan you have you want to either press the cookie for anywhere from 30 seconds to 1 minute. Once cookie is a golden brown take the cookie off the pan and let cool for a few seconds and sprinkle powdered sugar on top. Cut edges and keep on baking!

    I swear, these are some of the most amazing cookies you will ever have in your entire life. I love these cookies and look forward to them every holiday! Special thanks to my Mom for showing me how to make these<3